
Overview
Welcome to Branch!
This guide will help you:
- Set up your Branch account.
- Integrate Branch into your marketing stack.
- Measure and optimize your mobile growth efforts.
Introduction to Branch
The Branch Growth Platform is a powerful deep linking, attribution, and mobile growth solution that helps track user journeys across platforms, optimize marketing campaigns, and improve your users’ experience.
With Branch, you can:
- Accurately track user acquisition, re-engagement, and conversion across paid, organic, and owned digital channels.
- Enhance user experience with deep links that take users directly to in-app content.
- Optimize marketing campaigns with detailed attribution data.
Before you begin
Before starting the steps in this guide, you must sign up for the Branch Growth Platform.
Note
You must add a payment method to your account within 30 days of creating it. Learn more on our billing page.
Branch packages
Some features are included in the Branch Growth Platform, while others require you to sign up for them. Please contact our Sales team to learn more.
Activation
If you’re looking for onboarding information for our Activation product, check out our dedicated Activation Onboarding Guide.
Get started with Branch
Complete the steps in this guide to start launching campaigns powered by Branch’s deep linking and attribution solutions.
Some steps will require help from developers or other members of your team, this guide will point out when that is the case.
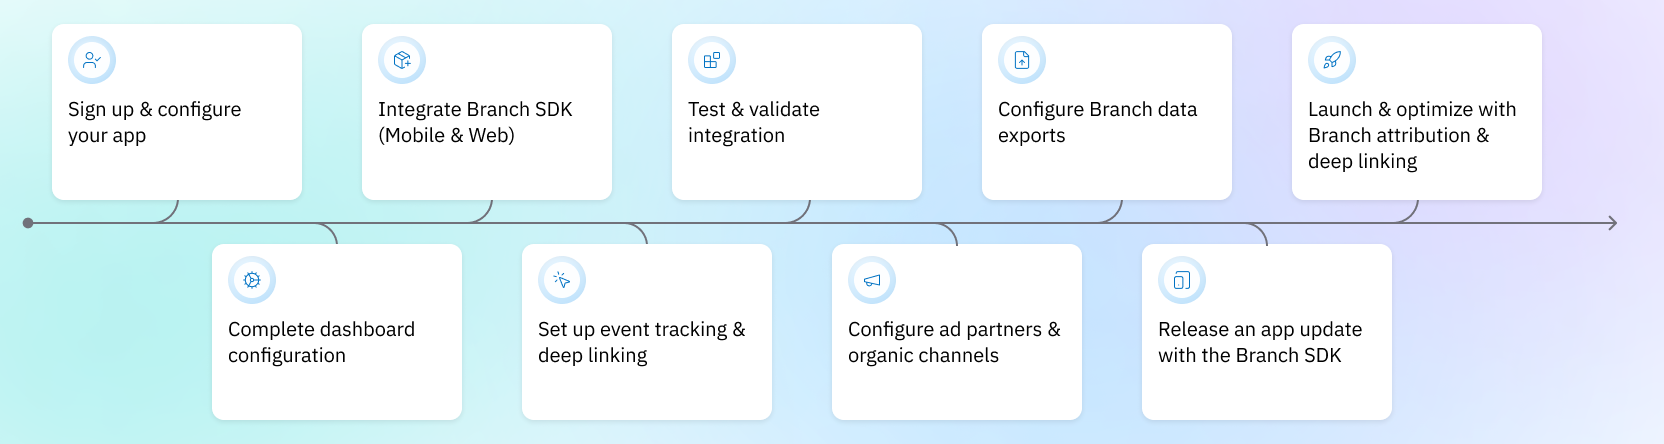
Branch Integration Roadmap
Step 1: Branch account
Set important values like default timezone, link domain, and global attribution window setting in Branch.
After you complete this step, you will be ready to start integrating Branch SDKs.
Expand to view tasks
In the context of this guide, the Account Admin is the primary owner and user of your Branch account.
| Task | Owner | Description | Time estimate* |
|---|---|---|---|
| Add relevant team members | Account Admin | Add users with relevant permissions to your Branch Dashboard on the Team tab. | 15 minutes |
| Set default timezone | Account Admin | Set your timezone in the Profile tab of the Branch Dashboard. | 1 minute |
| Set link domain | Account Admin, Marketing Team | Your link domain determines how your Branch Links will appear across platforms. Set up your link domain in the General tab of the App Settings page of the Branch Dashboard. | 30 minutes |
| Set global attribution window setting | Marketing Team | Attribution windows determine the attribution period for installs and other down-funnel events, starting from the time of the click. Set your global attribution window setting in the Attribution tab of the App Settings page of the Branch Dashboard. | 15 minutes |
| Decide on routing logic | Mobile Developers | Branch is built to work with your existing deep linking logic. The Branch SDK captures and shares data when someone opens your app with a Branch Link. Developers will need to decide which keys to read, and how to pass them to your routing flow. Use our Deep Link Data Options guide to understand the different keys Branch allows you to pass to your links (alternatively, you can also pass custom key-value pairs). | 2 hours |
| Finalize list of events to track | Marketing Team | Event tracking helps you enable attribution for down-funnel events. Remember to track the events that make the most sense to you in terms of attribution. Use our Branch Event guide to understand the different types of Branch Events in more detail. | 2 hours |
| Set up link configuration | Mobile Developers | Configure link behavior on the General tab of the App Settings page of the Branch Dashboard. | 1 hour |
Step 2: Branch mobile SDKs
Set the foundation for enabling deep linking into your app using Branch Links, and start tracking Branch Events.
After you complete this step, you can start using Branch Links in your apps, as well as analyze events and usage in the Branch Dashboard.
Expand to view tasks
Your mobile development team will own all of the tasks in this step.
| Task | Owner | Description | Time Estimate* |
|---|---|---|---|
| Integrate Branch mobile SDKs | Mobile Developers | Use the following guides to implement the relevant Branch SDKs into your apps: • iOS • Android • React Native • Flutter • Other plugins and wrappers | 8 hours |
| Test integration | Mobile Developers | Test and validate that your Branch integration is working as expected using the guides below: • iOS SDK Testing • Android SDK Testing View testing documentation for Branch's native SDKs in Developers Hub. | 16 hours |
| Set up in-app routing | Mobile Developers | Using data from the Branch SDK initialization callback, route the user to the correct content within your app. | 24 hours |
| Track events | Mobile Developers | Developers should track Branch Events based on the app's functionality, as well as the events list chosen by the marketing team in Step 1. Code samples demonstrating how to track Branch Events are available in our event tracking guide. We also recommend you review the conceptual content related to Branch Events in the Overview section of the guide. | 16 hours |
| Release app | Mobile Developers | Release the latest versions of your apps with the relevant Branch SDKs integrated to start using Branch Links and other Branch functionality. | 1 hour |
Troubleshooting:
Use the guides below if you need troubleshooting assistance during Branch SDK implementation:
Learn more:
Step 3: Branch Web SDK and Journeys
Track and attribute events on your website using the Web SDK, and set up Journeys banners.
After you complete this step, you can start tracking seamless web-to-app user experiences and conversion analytics.
Expand to view tasks
Journeys are smart, customizable web-to-app banners that drive seamless user transitions, increasing engagement and conversions.
Tracking and attribution:
| Task | Owner | Description | Time Estimate* |
|---|---|---|---|
| Implement Web SDK | Web Developers | Implement the Web SDK on your website using the Web Basic Integration guide. We recommend integrating the Web SDK on every page of your website for full coverage of web tracking and banner rendering on every page. Alternatively, set up the Web SDK using a tag manager: • Google Tag Manager • Adobe Launch | 30 minutes |
| Test Web SDK integration | Web Developers | Test your Web SDK integration using the Web Testing guide. | 1 hour |
| Track Branch Events | Web Developers | Track web events with Branch based on the critical functionality of your website, as well as the events list decided on by your marketing team. To implement tracking Branch Events with the Web SDK, visit the Web SDK Advanced Features page. | 2 hours |
| Deploy website | Web Developers | Deploy your website with the Web SDK implementation to production. After this, you can start using Branch Links and understanding attribution data across web. | 30 minutes |
Journeys:
| Task | Owner | Description | Time Estimate* |
|---|---|---|---|
| Enable Journeys | Marketing Team, Web Team | Drive web-to-app conversions using smart banners by turning on Branch Journeys. You can create a new Journey by going to the Journeys page of the Branch Dashboard and clicking the Create New Journey button. Find more information in our detailed Journeys guide. | 15 minutes per Journey |
| Configure Journeys creatives | Marketing Team, Web Team | Optimize Branch Journeys creatives with advanced configuration, HTML & CSS customization, and Desktop Journeys for seamless cross-device experiences. | 30 minutes |
Learn more:
- Engagement: Journeys
- Crack the Code: Perfect Your Banners
- Cross-Platform Banners: The Desktop-to-App Journey
- Dynamic Banner Templates
Access to Journeys requires a premium plan. Please contact our Sales team to learn more about pricing and availability.
Step 4: Ads
Configure your ad partner integrations and start tracking paid media performance effectively.
After you complete this step, you can enable attribution tracking and analyze campaign performance across ad networks in the Branch Dashboard.
Expand to view tasks
| Task | Owner | Description | Time Estimate* |
|---|---|---|---|
| Integrate Branch with ad networks | Product Manager, Marketing Team, Agency | Learn more about the different types of ad partners and how to integrate them with Branch using the guides below. Self-attributing network (SAN): • Google • Facebook/Meta • Apple Ads • Snap • TikTok For Business • Yahoo Non-SAN: • Affiliate Partners • Create Ad Links SANs report conversions directly to Branch, while non-SANs require Branch Ad Links to track clicks and impressions. Set up these integrations using the Partner Management tool in the Ads section of the Branch Dashboard. | 15 minutes per ad network |
| Configure SKAdNetwork for iOS | Product Manager | Configure SKAdNetwork (SKAN) for iOS attribution under Apple's privacy framework. In conjunction, enable Predictive Aggregate Measurement (PAM) with the flip of a switch for accurate and privacy-preserving campaign tracking without using IDFA. | 3 hours |
| Test ad partner integrations | Product Manager, Marketing Team, Agency | Validate and test the ad partner integrations you set using the Test Ads Campaign Setup guide. | 2 hours |
| Configure advanced ad capabilities | Product Manager, Marketing Team | Maximize ad impact with Engagement Builder for retargeting, Fraud Protection to secure spend, and ROI Hub for a complete view of your campaign spend and ROI. | 2 hours |
Note:
Always use Ad Links for paid campaigns to maximize attribution accuracy and campaign insights. They support $3p values, custom macros, and dynamic campaign data for seamless reporting. While Ad Links are required for affiliate partners, their usage in SAN campaigns depends on the ad partner and campaign type. Refer to the SANs Overview guide for SAN ad campaigns support.
To ensure accurate tracking and avoid discrepancies, it's essential to match the attribution windows and the timezone between Branch and your ad partners. This alignment helps provide consistent and reliable conversion data across all platforms. If not matched, the defaults from the app level are loaded automatically.
Learn more:
Step 5: Email
Configure your Email Service Provider integrations.
After you complete this step, you can use Branch Links in your email campaigns, ensure proper deep linking functionality, and track user engagement and conversions in the Branch Dashboard.
Expand to view tasks
| Task | Owner | Description | Time Estimate* |
|---|---|---|---|
| Verify your ESP integrates with Branch | Marketing Team, Email Service Provider, CRM Team | Search for your ESP in the email partners list. | 15 minutes |
| Configure click tracking domain (CTD) | Marketing Team, Email Service Provider, CRM Team | If possible, create a new click tracking domain. The majority of ESP integrations require that you update the DNS record for your CTD to include a CNAME (alias) record that points to Branch’s thirdparty.bnc.lt domain. Use the steps in our Email Integration guide to complete this configuration. | 1 hour |
Add CTD to Associated Domains and Info.plist | iOS Developers | In order for iOS to open the app when an email link is clicked, your CTD will need to be added to the Associated Domains and Info.plist, the steps for which can be found in our iOS Basic Integration guide. | 5 minutes |
| Add code to handle web-only links | Mobile Developers | Some links in your emails may be marked as web-only, so you will want to have code to route the user back to the web destination once the app opens and parses the URL. Use the sample apps below to see examples of this: • iOS • Android | 2 hours |
| Enable ESP integration | Marketing Team, Project Manager, Technical Team (Developers) | In the Branch Dashboard, navigate to the Manager tab of the Email section. Enable your ESP integrations here. On the Validate & Test page resolve any warnings or errors to ensure everything’s working correctly. | 15 minutes |
| Flag links in email templates | Marketing Team, CRM Team | Many integrations require that you flag links in the email template before you send it. Use the Email Integration guide and click the Help Me Flag My ESP’s Links button. Search for your ESP to find the specific steps for your integration. | 10 minutes per email template |
| Validate integration | CRM Team, QA Team | Generate a test link and/or send a test email to an internal audience to ensure the Branch Links in your email work as expected. | 3 hours |
Note:
For deep link data like $canonical_url to be passed, you will need to:
- Go to Validate & Test in the Manager tab
- Click Deep linking is set up for email
- Enable the first 3 check boxes
- Add
$canonical_urlto the translate option
Learn more:
Step 6: Data Feeds
Integrate third-party analytics providers and configure data exports.
After you complete this step, you can enable automated data exports to your preferred third-party destination for in-depth analysis and reporting.
Expand to view tasks
| Task | Owner | Description | Time Estimate* |
|---|---|---|---|
| Verify analytics partner integration exists | Data Team, Project Manager | Make sure Branch integrates with your chosen analytics partner(s) by searching for them in the Data Integration Partners list. | 15 minutes |
| Enable analytics partner integration(s) | Data Team | To enable your analytics partner data integration(s), use the Data Integrations tab under Data Feeds in the Branch Dashboard. You can also find detailed steps in the Data Integration Implementation guide. | 15 minutes per partner |
| Pass partner metadata to Branch SDK | Mobile Developers | You will need to pass specific partner data to the Branch SDK before initialization. To see what data you need to pass, visit the Data Integration Partners list and search for the data integration partner. Click on it to view the details of that data integration partner. | 1 hour |
| Verify events are being sent | Data Team, QA Team, Mobile Developers | Ensure that Branch Events are appearing on the Branch Dashboard in the Liveview tool. In the Webhook Records tab, filter by the Webhook Partner Key of your analytics partner (specified in the Branch documentation for that ad partner integration). Please note that this tool has a delay of a few minutes, and you may need to click the Update Session button to see data populate. The specific filters for each analytics partners are included on their individual documentation pages, for example: • Adobe Analytics • Google Analytics • Mixpanel Finally, check that you are seeing the Branch Events on the analytics partner’s dashboard. | 2 hours |
| Move Branch data into storage of choice | Data Team | Use Branch’s APIs to export your data to various different storage options. For example, the Scheduled Log Exports API lets you send your data to your own AWS or GCP account, store your data in a Branch-owned S3 bucket, or have the data emailed to you on a regular cadence. Log level: • Daily Export API • Custom Export API • Scheduled Log Exports API Aggregate: • Aggregate API • Query API • Cross-Events Export API • Unified Analytics Export To learn more about API access, please contact our Sales team. | 3 hours |
Step 7: SEO App Attribution & deep linking from search ads
Analyze users coming from organic search, including the down-funnel actions they perform within the app.
After you complete this step, you can start attributing app conversions from organic search traffic and getting visibility into app engagement driven by search engines.
Expand to view tasks
| Task | Owner | Description | Time Estimate* |
|---|---|---|---|
| Configure Universal Links and App Links | Technical Team (Developers) | Enable your own business domain (this is where your website lives, for example www.yourcompany.com) as Universal Links and App Links. This is required for Google Ads, SEO, and any marketing channels that don't support third-party links like Branch Links. This is separate from your Branch Link domain configuration.Setting up Universal Links and App Links ensures that your app is opened directly when users visit your domain from search engines, ads, or other channels. Use the guides below to enable Universal and App Links: • Universal Links • App Links | 1 hour |
| Add SEO domains | Technical Team (Developers), Marketing Team | Enter your top-level domain (SEO domain) in the Configuration tab of the SEO page of the Branch Dashboard to register SEO attribution using Branch. For more detailed steps, follow the SEO App Attribution guide. | 5 minutes |
| Test integration | Technical Team (Developers) | Test the overall integration using the testing section of the SEO App Attribution guide. | 1 hour |
Step 8: Advanced Compliance
Advanced Compliance helps companies in healthcare or other highly regulated industries benefit from Branch's comprehensive set of mobile measurement tools, without sacrificing user privacy.
With Advanced Compliance, your data is sent to an isolated network endpoint, which hashes and anonymizes PII as soon as it is received.
Expand to view tasks
| Task | Owner | Description | Time Estimate* |
|---|---|---|---|
| Ensure you are on the minimum required SDK version | Technical Team | Ensure your Branch SDK version is on the minimum required version to enable Advanced Compliance. You can check your current SDK version by navigating to the Integration Status tab in your Branch app settings (Android, iOS). | 1 hour |
| Configure your Branch SDK to use the protected API endpoint | Technical Team | Configure your Branch SDK to use the following endpoint: https://protected-api.branch.io Learn more in our full reference guides:Android Full Reference iOS Full Reference Web Full Reference | 5 minutes |
| Ensure your Branch link domain is supported with Advanced Compliance | Technical Team | Configure specific subdomains on app.link before enabling Advanced Compliance. Custom subdomains are not supported. | 5 minutes |
| Complete domain salt configuration | Technical Team | Initiate the process for Branch to configure the domain salt by filing a high-priority support ticket. | 5 minutes |
| Validate Advanced Compliance | Technical Team | Confirm that the request URL and remote address on your Branch-triggered events is reflecting the protected API endpoint: https://protected-api.branch.io | 20 minutes |
Caution: changing your Branch domain
Please note that once Advanced Compliance is enabled, changing your Branch domain will automatically revert those changes and your traffic will no longer be protected. If you absolutely must change your domain after enabling Advanced Compliance, reach out to Branch to coordinate and ensure a smooth transition.
At the end of this step, you will have successfully set up Advanced Compliance, enabling web and app triggered events to pass through Branch’s isolated API endpoint.
Additional support
Branch offers several ways to connect with expert guidance as you learn how to use all the powerful features of the Branch Growth Platform.
Live trainings
For continued learning, Branch University offers live, expert-led training sessions designed to help you master our products, sharpen your skills, and gain hands-on experience. These sessions provide an opportunity to ask questions directly to our trainers, ensuring you get the most out of the Branch Growth Platform.
Professional Services
For deeper technical support, QA testing, or custom solutions, our Professional Services team is here to help. We offer dedicated workshops to better understand your goals, assist with setup, and provide guidance through go-live and beyond.
To learn more, please reach out to your Branch point of contact or contact our Sales team to request scoping.
*The time estimates provided for each task are approximate and intended as general guidance. Actual completion times may vary depending on factors such as your team’s prior experience with Branch and the complexity of your existing app logic.