
Overview
With Branch Activation, you can create shortened Web and App Links (with custom QR codes) that work everywhere.
How Branch Links work
Web Links are web-only Short Links that work everywhere. App Links are deep links that take users to specific pages in your app. Web and App Links look the same (yourbrand.com/slug or yourbrand.app.link/slug) depending on if you choose to use a custom domain or a Branch-provided app.link domain.
Expected behavior for Web Links
If your end user does not have your app installed, or if you don’t have an app, the link will open in their default web browser. If they do have your app downloaded, the link will open in your app through an in-app web view.
Expected behavior for App Links
If your end user has your app installed, the App Link will deep link to the specific app page you’ve chosen. If they do not have your app installed, they will be taken to the redirect destination for non-app users which can be configured as a web page, a Branch Deepview, or the app store listing to download the app.
Before you begin
You can set up a custom domain in the Branch Dashboard or you can use the Branch-provided app.link domain. If you want to create App Short Links, you must integrate the Branch SDK into your app(s). If you only want to create Web Short Links that go to an internet browser, no additional setup is required.
Note
For now, you can only configure one custom domain. However, we will add support for multiple custom domains in the future.
Set up a custom domain (optional)
Before you use Activation features, you can set up a custom domain (for example, link.yourbrand.com) in the Branch Dashboard. Read our Advanced Settings & Changing Link Domain article to learn how.
After you set up your custom domain, you can use it to create branded Web Short Links.
Set up deep linking and app integration (optional)
To create App Short Links using Activation, you must integrate the Branch SDK into your app(s). You must also have the latest version of the Branch SDK installed for in-app web views to work.
Tip
If you don’t want to create App Short Links to deep link to your app or show an in-app web view for Web Short Links, you can skip this setup.
Read the following articles to learn more:
Create a Web Short Link
Web Short Links are web-only Short Links that work everywhere.
Step 1: Start creating link
Complete the following steps to start creating a link:
- In the Branch Dashboard, select the Create button in the top-right corner of the page.
- Select Link.
- Select Short Link. The Create Short Link page will open.
Step 2: Define your Web Short Link
Complete the following steps to define your link:
- Enter your link title in the Link Title text field. We recommend standardizing your link names to make them easily searchable.
- Select Web.
- Enter the long URL that you want to shorten in the Destination text field. This is where your Short Link will redirect to.
- (Optional) Enter a custom link alias (slug/back-half) in the Link Alias text field. You won’t be able to change this once you select Create Link.
Step 3: Add analytics tags (optional)
Add analytics tags to your link to sort and compare performance with your other links.
You can add analytics tags in two ways in the Analytics Tags section:
- Use the drop-downs to select analytics tags that you’ve used in the last 30 days.
- Enter new analytics tags in the text fields and select Create [ANALYTICS TAG] to create a new tag.
Available Tags
You can add the following analytics tags to your link:
- Feature: Should describe the action or product where this link is placed. For UTM, this is typically utm_medium.
- Channel: Should describe the platform or source from which you are expecting users to click this link. For UTM, this is typically utm_source.
- Campaign: This can vary, but it should describe the theme of the link. For UTM, this is typically utm_campaign.
- Tags: Tags are a free-form list of meaningful labels that can be used as filters in the Short Links table. Use them to keep your analytics organized.
Note
For a tag from a previous Short Link to appear in the drop-down list, the previously created Short Link must be published with at least one click on it.
Step 4: Add link data (optional)
Add any custom link settings, custom analytics tags, or custom redirect logic. You can view custom data options and advanced analytics tag options in our Create Deep Links article.
Advanced Link Configuration for Web Links
| Key | Usage |
|---|---|
$fallback_url_xx | Change the redirect endpoint for all platforms based on a lower-case Alpha-2 country code. For example, $fallback_url_de="..." would redirect Germany deep link clicks. You should also set $fallback_url to act as the global redirect in addition to the country-specific ones. WARNING: If platform specific redirects (like $ios_url or $desktop_url) are set, they will override the country-specific redirect. Thus, the recommendation is to only use $fallback_url_xx for the country specific redirects and $fallback_url to catch all other users. |
$exp_date | Expiry date for the content and any associated link data. Represented as UTC epoch millisecond. The maximum date this can be set is 31 days in the future. |
$desktop_url | Redirect URL for desktop devices - mobile users will default to the app store. |
$ios_url | Change the redirect endpoint for iOS App Store page for your app (set in Link Settings). |
$ios_url_xx | Change the redirect endpoint for iOS based on a lower-case Alpha-2 country code. For example, $ios_url_de="..." would redirect Germany deep link clicks. You should also set $ios_url to act as the global redirect in addition to the country-specific ones. |
$android_url | Change the redirect endpoint for Android Play Store page for your app (set in Link Settings). |
$android_url_xx | Change the redirect endpoint for Android based on a lower-case Alpha-2 country code. For example, $android_url_de="..." would redirect Germany deep link clicks. You should also set $android_url to act as the global redirect in addition to the country-specific ones. |
$ipad_url | Change the redirect endpoint for iPads $ios_url value |
$samsung_url | Redirect to Samsung Galaxy Store on Samsung devices. Only link level control. Format should be http://www.samsungapps.com/appquery/appDetail.as?appId=YOUR.PACKAGE.NAME |
$windows_phone_url | Change the redirect endpoint for Windows OS Windows Phone default URL (set in Link Settings). |
$blackberry_url | Change the redirect endpoint for Blackberry OS BlackBerry default URL (set in Link Settings). |
$fire_url | Change the redirect endpoint for Amazon Fire OS Fire default URL (set in Link Settings). |
$ios_wechat_url | Change the redirect endpoint for WeChat on iOS devices $ios_url value. |
$android_wechat_url | Change the redirect endpoint for WeChat on Android devices $android_url value. |
Step 5: Customize QR code (optional)
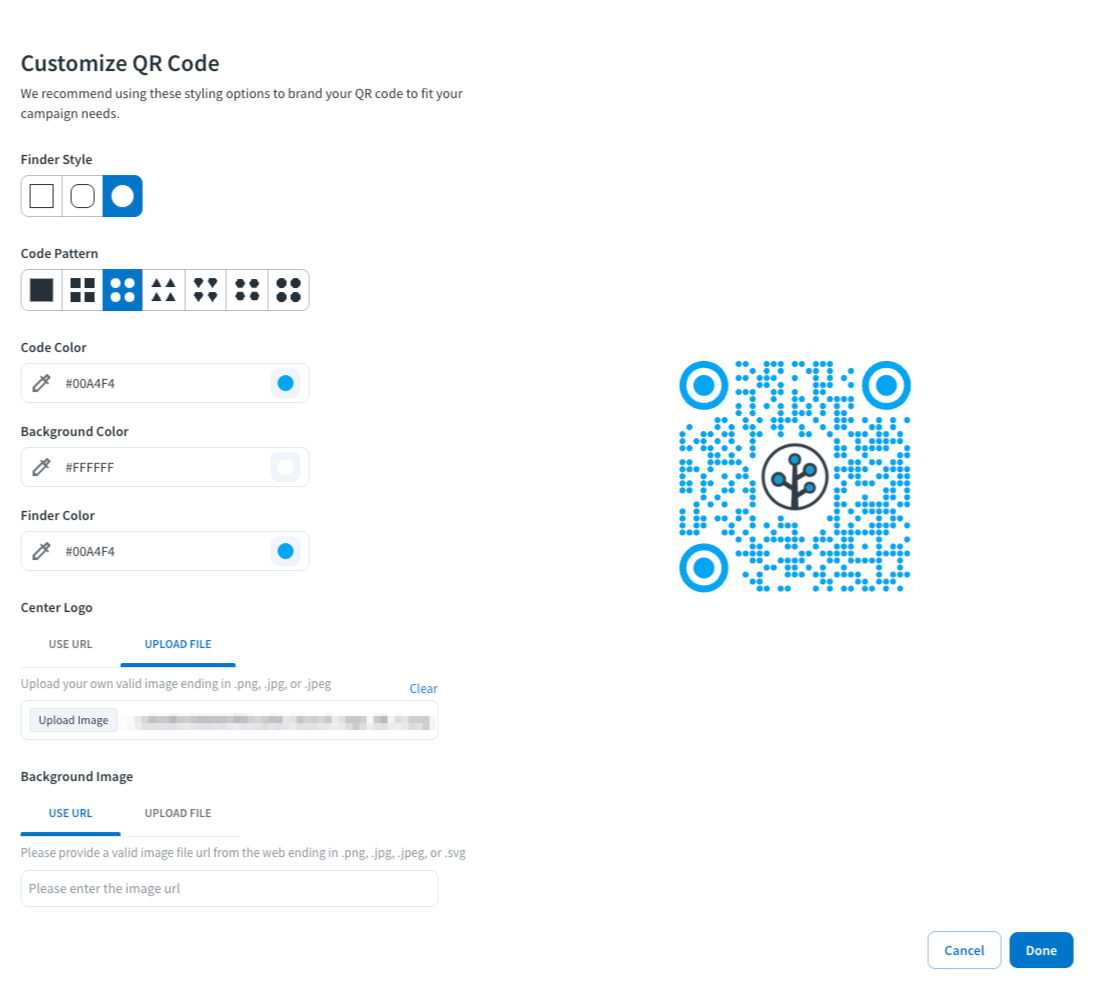
Customize the QR code for this link by selecting the pencil icon above the QR Preview section. Learn more in our Customize QR Codes article.
Select Done to save your customizations.
Step 6: Customize link preview (Optional)
Customize the link preview for this link by selecting the pencil icon above the Link Preview section. You can customize the title, description, and background image. This is what your link will look like on social media platforms, messaging apps, and anywhere that supports link previews.
Select Done to save your customizations.
Step 7: Finish creating your link
Select Create Link to finish creating your link.
Create an App Short Link
App Short Links are deep links that take users to specific pages in your app.
Step 1: Start creating link
Complete the following steps to start creating a link:
- In the Branch Dashboard, select the Create button in the top-right corner of the page.
- Select Link.
- Select Short Link. The Create Short Link page will open.
Step 2: Define your App Short Link
Complete the following steps to define your link:
- Enter your link title in the Link Title text field. We recommend standardizing your link names to make them easily searchable.
- Select App.
- Enter the long URL that you want to shorten in the Destination text field. This is where your Short Link will redirect to.
- (Optional) Enter a custom link alias (slug/back-half) in the Link Alias text field. You won’t be able to change this once you select Create Link.
Step 3: Add analytics tags (optional)
Add analytics tags to your link to sort and compare performance with your other links.
You can add analytics tags in two ways in the Analytics Tags section:
- Use the drop-downs to select analytics tags that you’ve used in the last 30 days.
- Enter new analytics tags in the text fields and select Create [ANALYTICS TAG] to create a new tag.
Available tags
You can add the following analytics tags to your link:
- Feature: Should describe the action or product where this link is placed. For UTM, this is typically utm_medium.
- Channel: Should describe the platform or source from which you are expecting users to click this link. For UTM, this is typically utm_source.
- Campaign: This can vary, but it should describe the theme of the link. For UTM, this is typically utm_campaign.
- Tags: Tags are a free-form list of meaningful labels that can be used as filters in the Short Links table. Use them to keep your analytics organized.
Note
For a tag from a previous Short Link to appear in the drop-down list, the previously created Short Link must be published with at least one click on it.
Step 4: Add redirects (optional)
To add custom redirects, select the drop-down menu for the platform you want to change and choose a new path.
Add information about what should happen if your app is not installed when the user clicks on the link. We can take the users to the app store, open a web page, or open a Deepview.
Links you create will automatically inherit redirects on iOS, Android, and Desktop based on default settings applied to your account.
You can override those defaults and direct users to specific locations if the app is not installed by adding them in the Redirects section.
Available Redirects
You can add the following redirects to your link:
- Default Redirect: Set at the account level in your Link Settings. This is typically set to the relevant mobile stores.
- Web URL: Send users to a specific web page if they don’t have your app to avoid an unexpected flow to the app store.
- Deepview: Send users to a specific Deepview you created in the Branch Dashboard. Copy the Deepview key and paste it into this text box. This is useful if you want to present the user with a preview of the content before taking them directly to the app store, but should not be set for the Desktop option.
Step 5: Add link data (optional)
Add any custom link settings, custom analytics tags, or custom redirect logic. You can view custom data options and advanced analytics tag options in our Create Deep Links article.
Step 6: Customize QR code (optional)
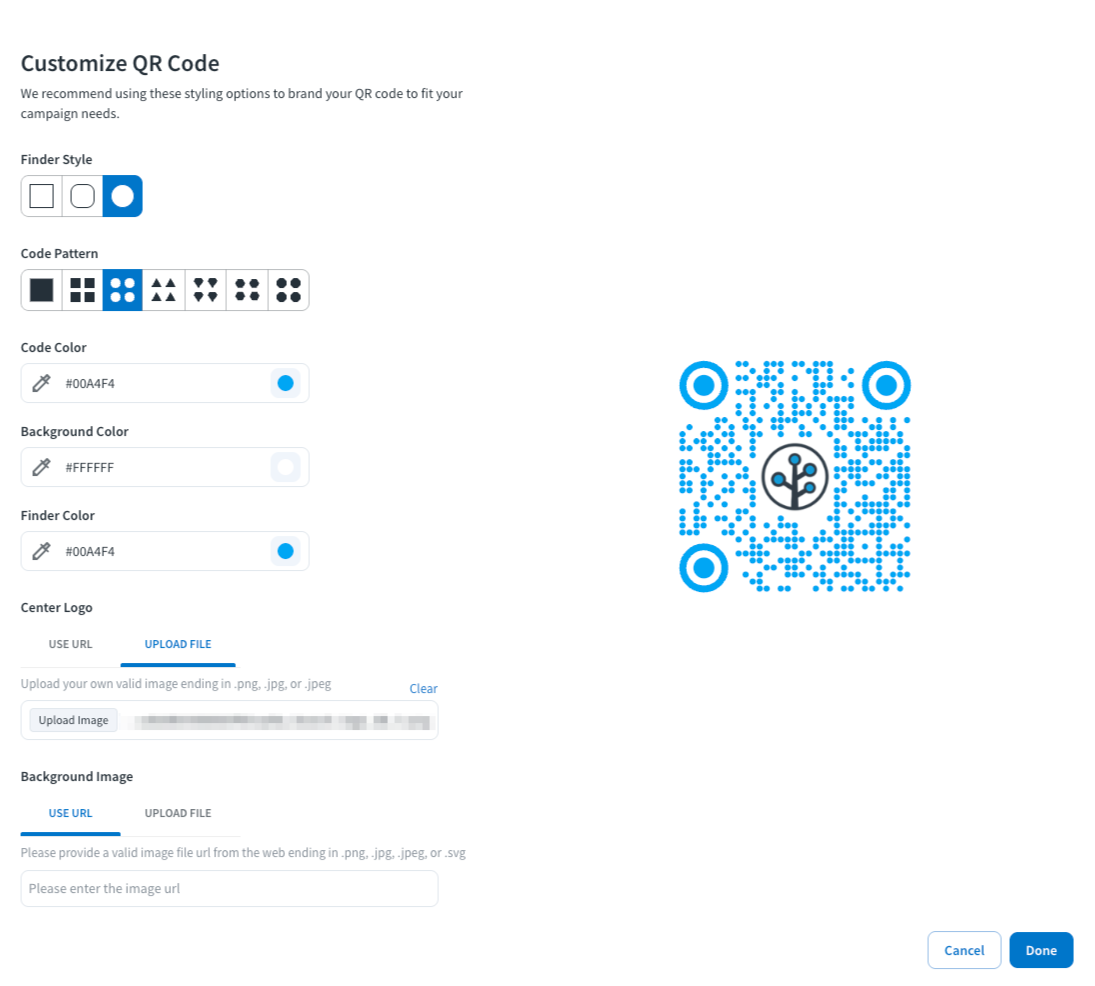
Customize the QR code for this link by selecting the pencil icon above the QR Preview section. Learn more in our Customize QR Codes article.
Select Done to save your customizations.
Step 7: Customize link preview (optional)
Customize the link preview for this link by selecting the pencil icon above the Link Preview section. You can customize the title, description, and background image. This is what your link will look like on social media platforms, messaging apps, and anywhere that supports link previews.
Select Done to save your customizations.
Step 8: Finish creating your link
Select Create Link to finish creating your link.
View and manage links
You can use LinkHub to manage and view your Short Links. You can learn more in our LinkHub article. With Activation you’ll see separate Web Short Links and App Short Links tabs.
You can also view Web Short Links on the Summary page in the Branch Dashboard on the All Data and Short Links tabs.
Analyze link performance
LinkHub
In LinkHub, you can view how many clicks your links have received. Select the Clicks column in the table to sort by most clicks or least clicks. You can learn more in our LinkHub article.
Overview page
On the Overview page, use the Summary or Sources tabs to view relevant analytics for your links. Read our Overview Page article to learn more about comparing and filtering results.