Salesforce - Open Web Default
Overview

Meet Email Studio. Reach your customers with the world’s #1 email marketing platform. Build smarter email — from basic marketing campaigns to sophisticated 1-to-1 messages.
1. Complete Universal Email Prerequisites
DEVELOPER MAY BE REQUIRED
The following Universal Email prerequisite includes providing URI schemes and other components that may require a developer:
DEVELOPER REQUIRED
The following Universal Email prerequisites involve app code changes:
2. Configure Salesforce
Enable web-only default tagging in your Salesforce Account
Work with your Salesforce and Branch Account Managers to enable web-only default tagging for your Salesforce BU, by providing your Salesforce account MID(s). Once enabled, all emails sent from those MIDs will click wrap every link with a click tracking domain using a
/upath, which prevents the app from opening in iOS (Emails that have already been sent before enabling will open the app because they will not have/uin the path).If you run Journey Builder / Triggered Sends, you must do one of the following to ensure the web-only tagging is applied to those emails:
- Republish the journey triggered sends via Email Studio Triggered Send dashboard
- Update the email activities in Journey Builder
- Create a new journey version
Secure your Salesforce Click Tracking Domain
If your click tracking domain is not secure (i.e., secure domains will start with https://), you will need to purchase an SSL SKU from your Salesforce Account Manager.
NOTE: Please keep in mind Salesforce can take 4-6 weeks to process SSL certificate requests.
Configure your AASA file in Salesforce Marketing Cloud
Your Salesforce account must be configured to correctly handle Universal Links. Configure the settings in Deep Linking under the Send Management section in Email Studio. Ensure you're in the account corresponding to the correct click tracking domain.
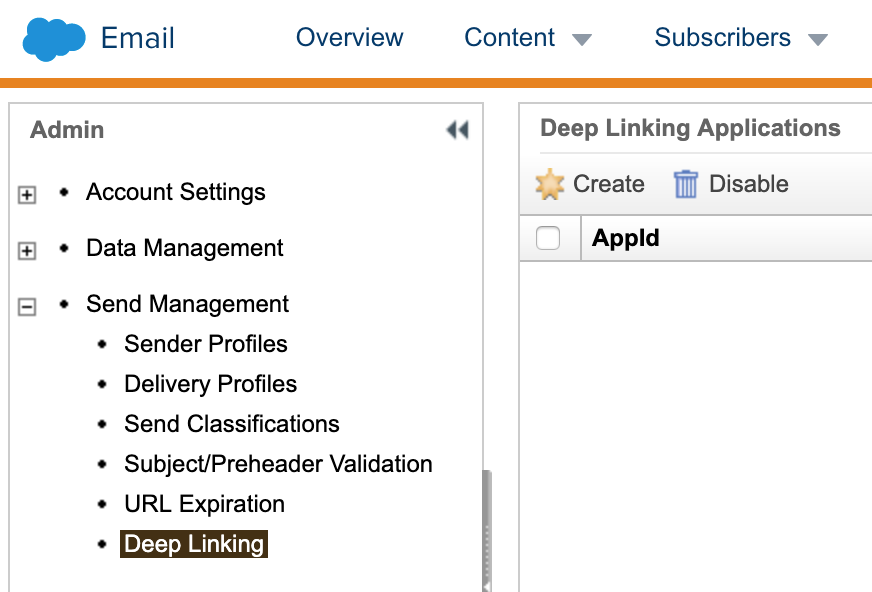
- Enter the AppID value
- Check the "Exclude Profile" and "Unsub Center" checkboxes to force links to these items to open in the browser and not the app, if desired.
- Click "Save" to save the configuration.
- Let Salesforce and Branch know that you've finished this step and your Technical Account Manager will verify that everything looks good.

3. Enable the Integration
To enable the integration:
- In the left-hand navigation, click Email.
- On the Email overview page, click the Manager tab at the top.
- Find your ESP and click Enable.
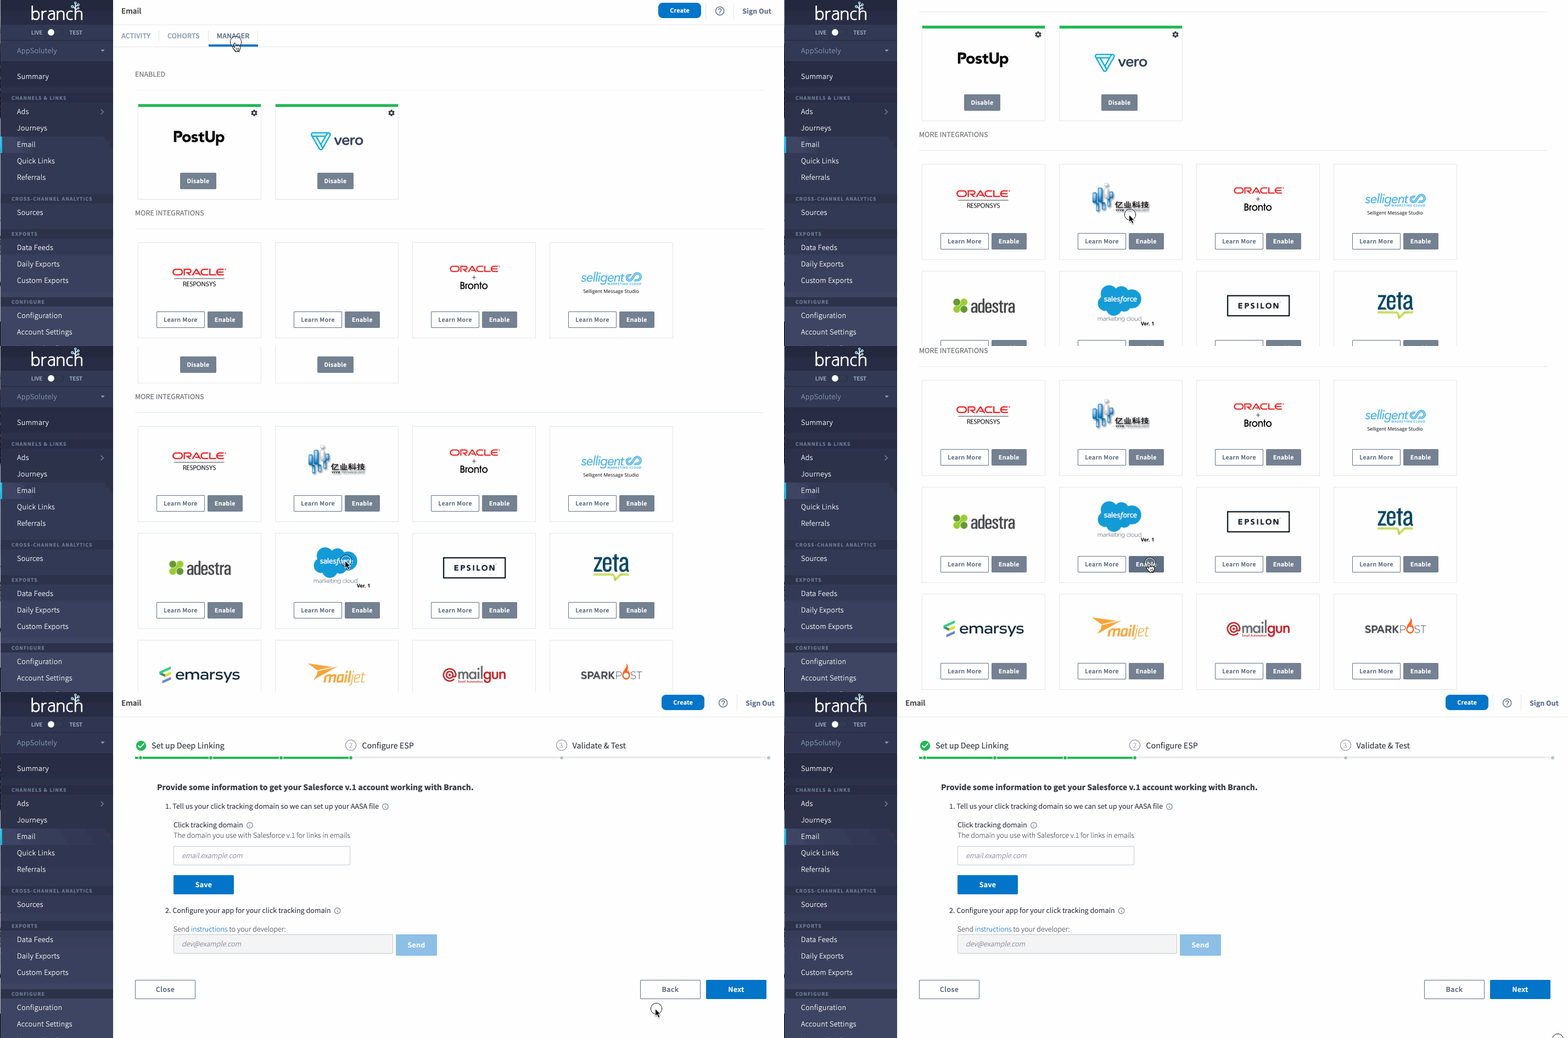
Branch automatically detects any global link settings you have already provided during the initial setup of your Branch account as outlined above.
If you have not set up your global link settings and redirect preferences, you will be prompted to do so at this time.
4. Provide Click Tracking Domain
Click tracking domains allow you to track engagement on email opens and link clicks.
If you're unsure what your click tracking domain (CTD) is, take a look at one of your recently sent emails. If you hover over the link or right-click/copy the link address, you will see that the domain of the link in the email does not match the URL in your HTML. This domain is your click tracking domain used by your ESP to provide you click reporting.
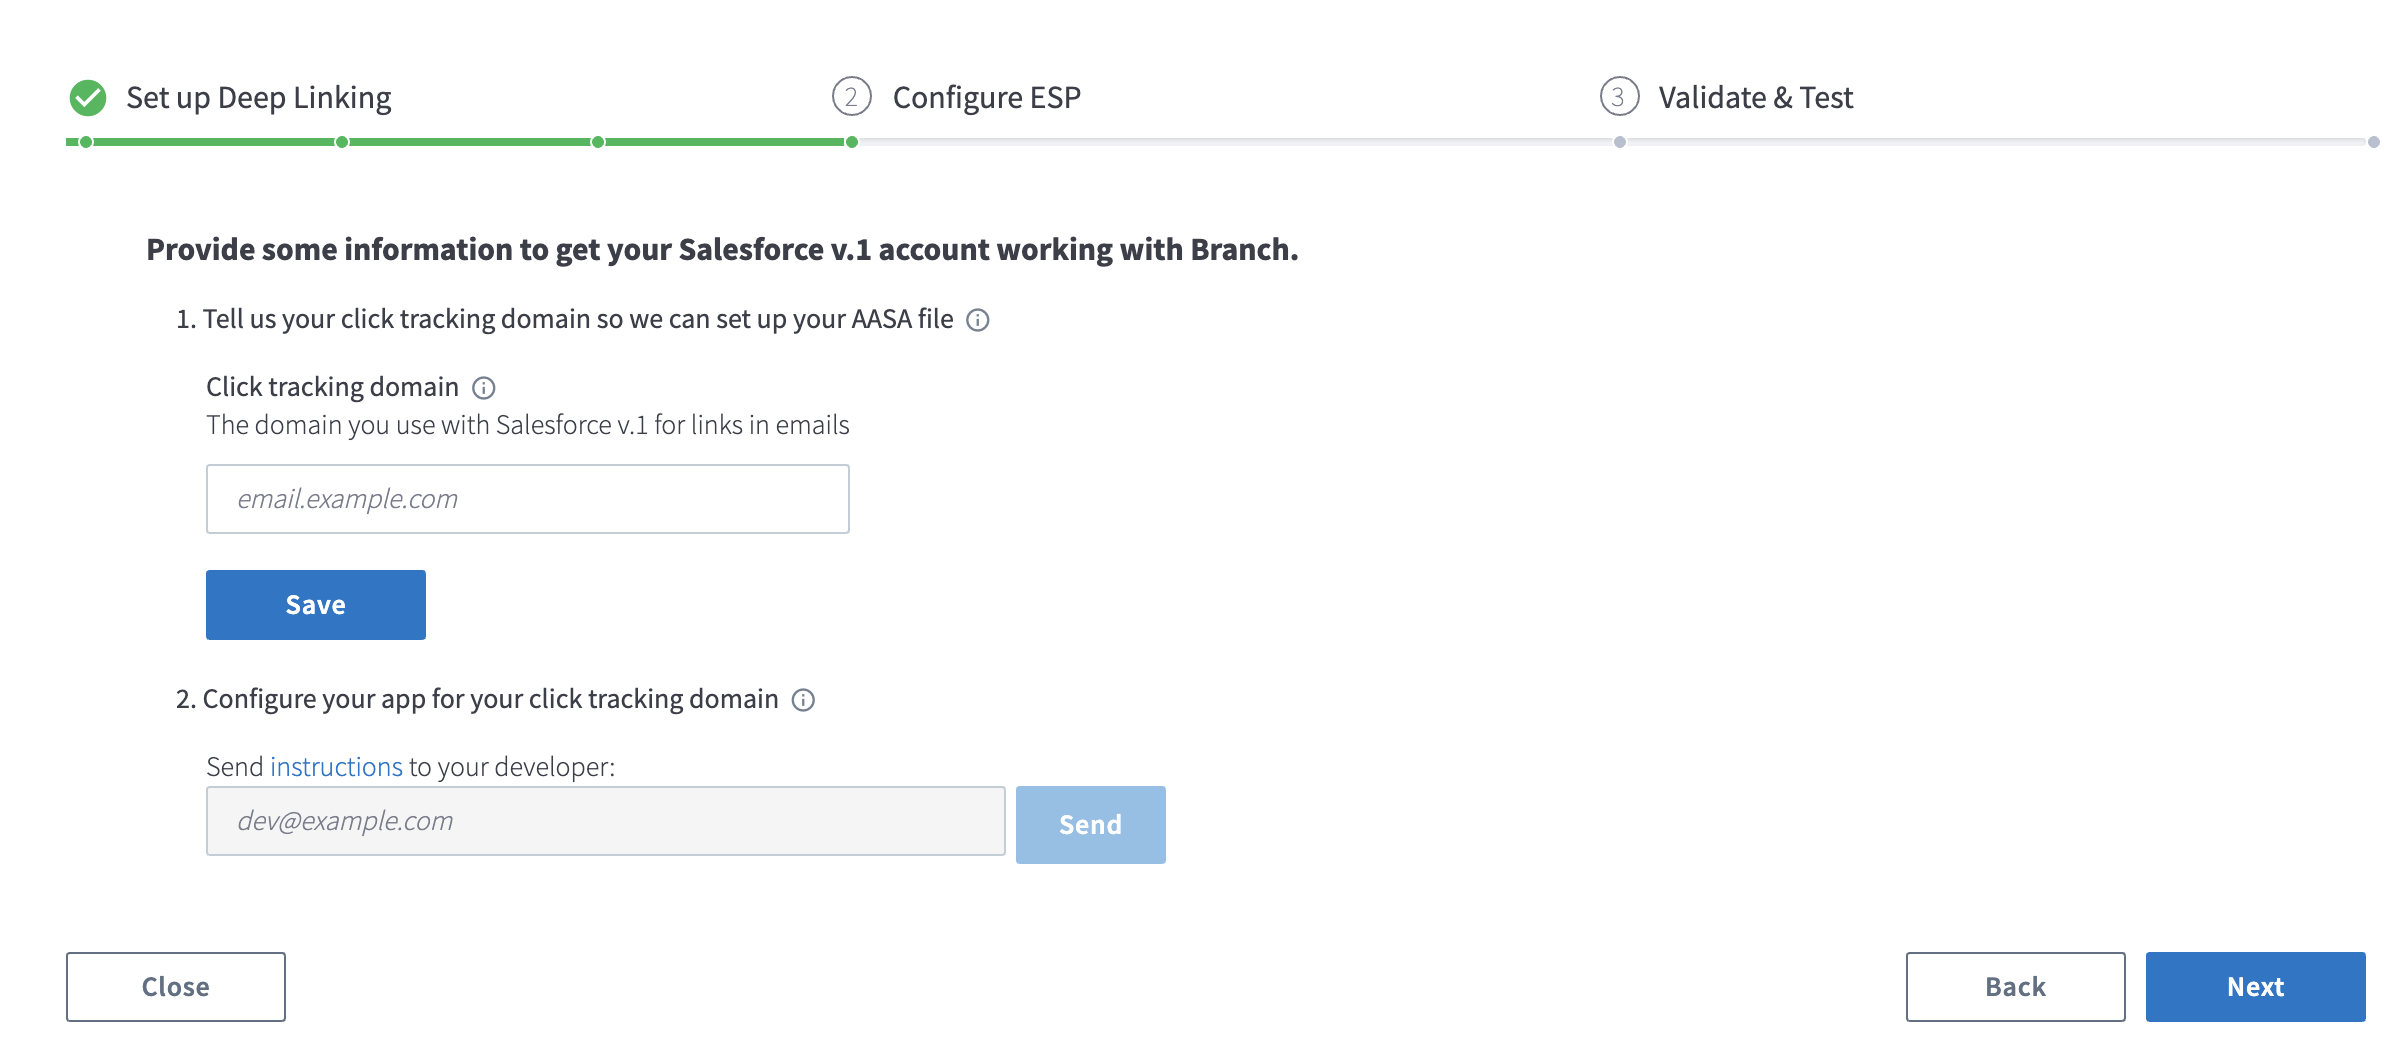
The Salesforce v1 Open Web Default integration requires you provide the following:
- Click Tracking Domain - The domain you use with Salesforce for links in emails
Remove
http://orhttps://when adding your click tracking domain in the Branch dashboard
KEEP IN MIND
- You can enable the integration with multiple CTD if needed, but you cannot add the same CTD to multiple Branch dashboards or ESP integrations.
Before you click NEXT and proceed to the Validate & Test section, please complete the following section as it’s required for passing integration validation.
5. Validate the Integration
Once the SSL certificates and AASA file (iOS only) have been generated, you can proceed to reviewing the validation tests, fix any issues and then test the integration.
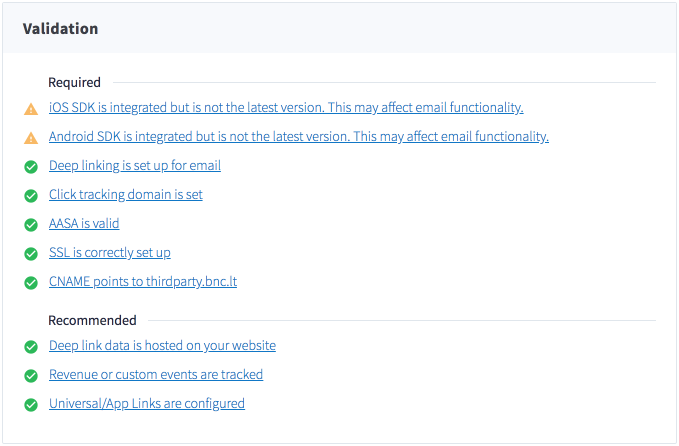
Branch automatically validates the following:
- iOS SDK is integrated (required)
- Android SDK is integrated (required)
- Deep linking is setup (required)
- Click Tracking Domain is setup (required)
- AASA file is valid (required)
- SSL is correctly setup (required)
- CNAME points to thirdparty.bnc.lt (case-by-case requirement)
- Universal Linking is setup (required)
- Hosted deep link data (optional)
- App Events being tracked (optional)
- Android App Links (optional)
Common Validation Issues
CNAME Does Not Point to Branch
As this integration requires the CNAME to point to Salesforce, you will always get this error. You can safely ignore.
SSL Not Correctly Set Up
If you are having issues with the SSL certificate validating, the culprit is generally the fact that your click tracking domain already has SSL set up and there are restrictions that prevent a 3rd party from submitting a Certificate Signing Request on your behalf.
AASA File is Invalid
Luckily the easiest issue to fix as the main reason for this error is the fact that it depends on the SSL being set up correctly. By addressing the SSL error, the AASA file error should resolve itself simultaneously.
6. Test the Integration
Once the validation process is complete, you can test the integration by generating a test link. The test link generated by Branch is unique in that it’s already converted to a Branch link for you and allows you to test without creating an email template in your ESP. In reality, this conversion happens behind the scenes once a user clicks on your normal email template link.
To generate a test link:
- In the Validate & Test section, input a URL from your website.
- Click Get Test Link.
- Once the Test Link is generated, you can share it via:
- Copy to clipboard
- SMS
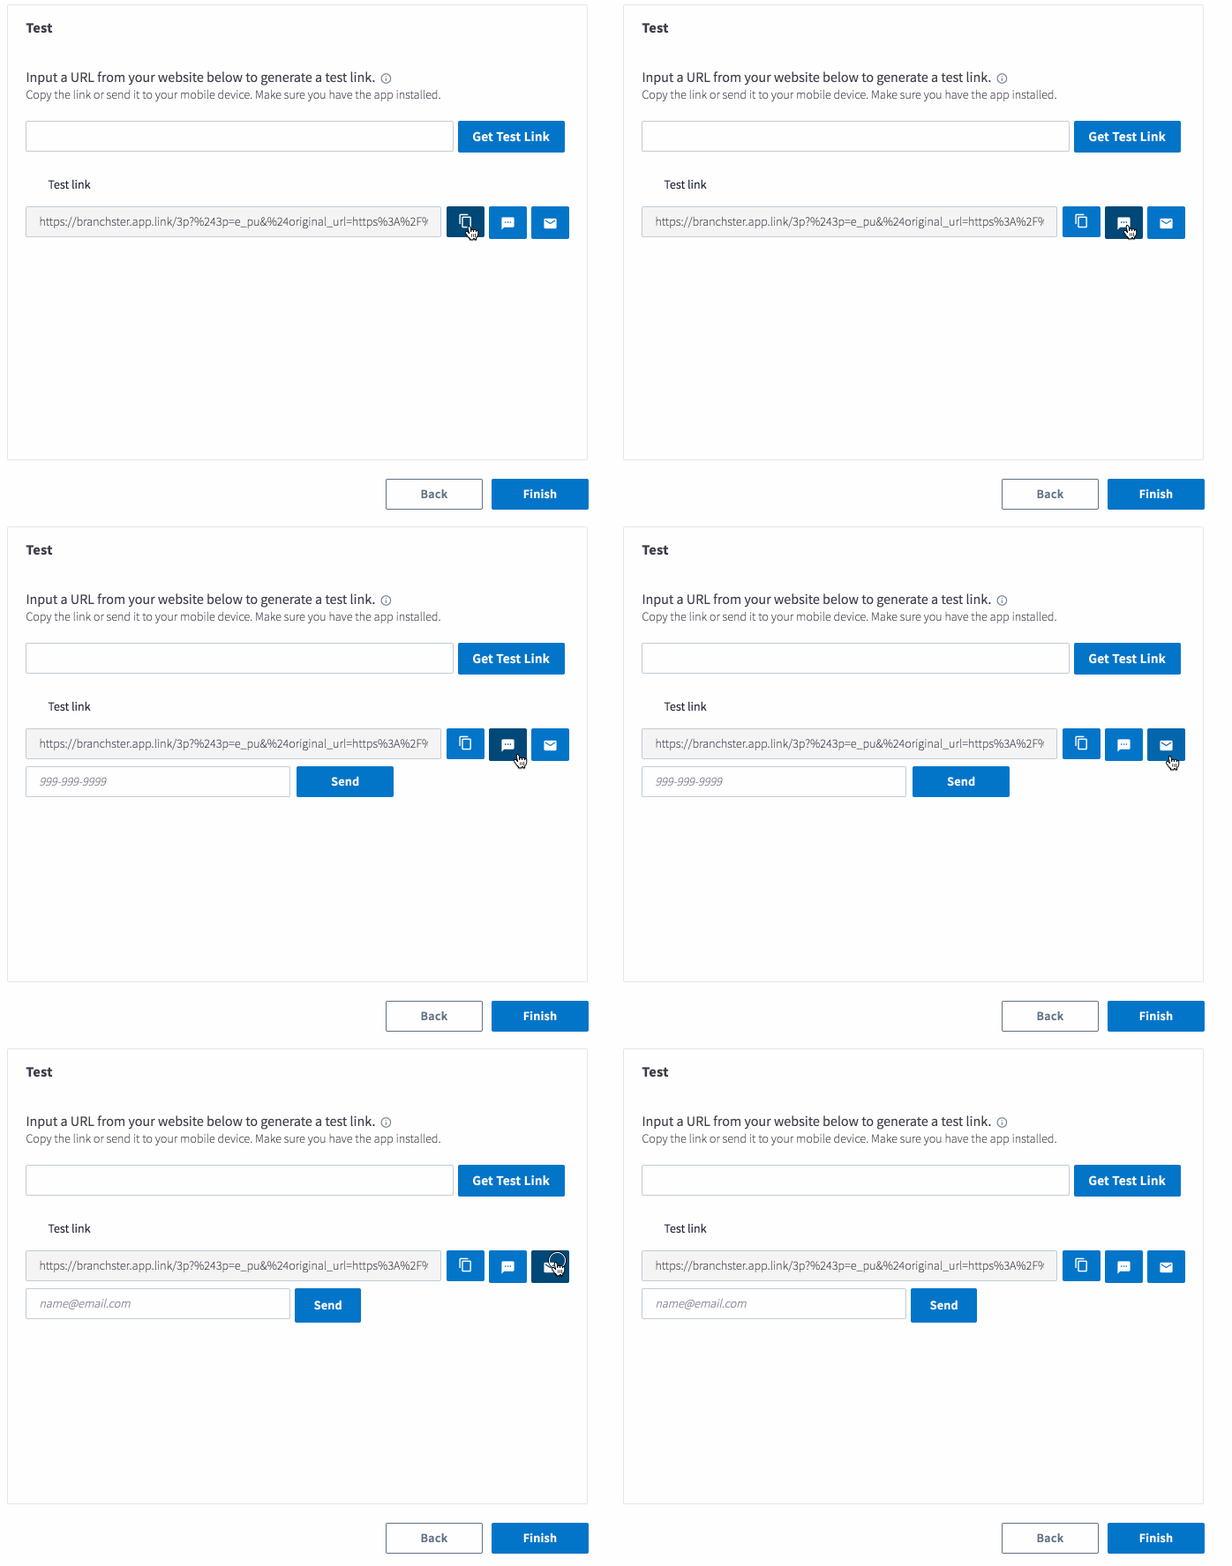
Once you’ve generated your test link, click the link on your mobile device; don’t forget to make sure your mobile device already has the app installed!
7. Generating Branch Links for Email
Domain Usage
Only use the app.link subdomain assigned to your app as the
branch_base_url. Do not use custom subdomains or root domains.
1. Use Salesforce AMPscript to convert links
Using Salesforce's AMPscript, we'll add a new Content Area in Salesforce that converts web links in your email templates into Branch links.
-
Work with your Branch account manager to modify the following Salesforce AMPscript snippet, replacing
DOMAIN-HEREwith your Branch base domain (i.e., example.app.link):%%[ VAR @deeplink, @branch_base_url SET @branch_base_url = "https://DOMAIN-HERE/3p?%243p=e_et" SET @deeplink = CONCAT(@branch_base_url, CONCAT("&%24original_url=", URLEncode(@link_to_be_wrapped, 1, 1))) ]%% -
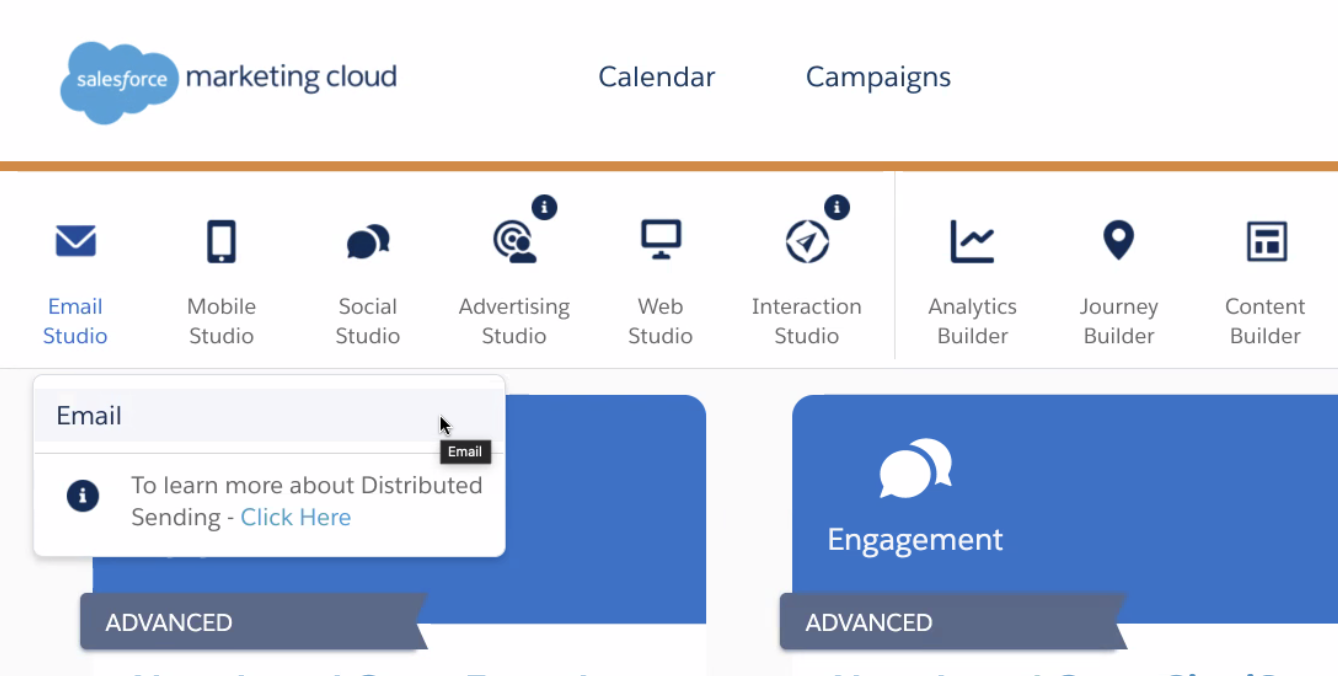
After logging into Salesforce Marketing Cloud, click on Email Studio and then a sub-menu will appear. Click on Email in the dropdown menu:
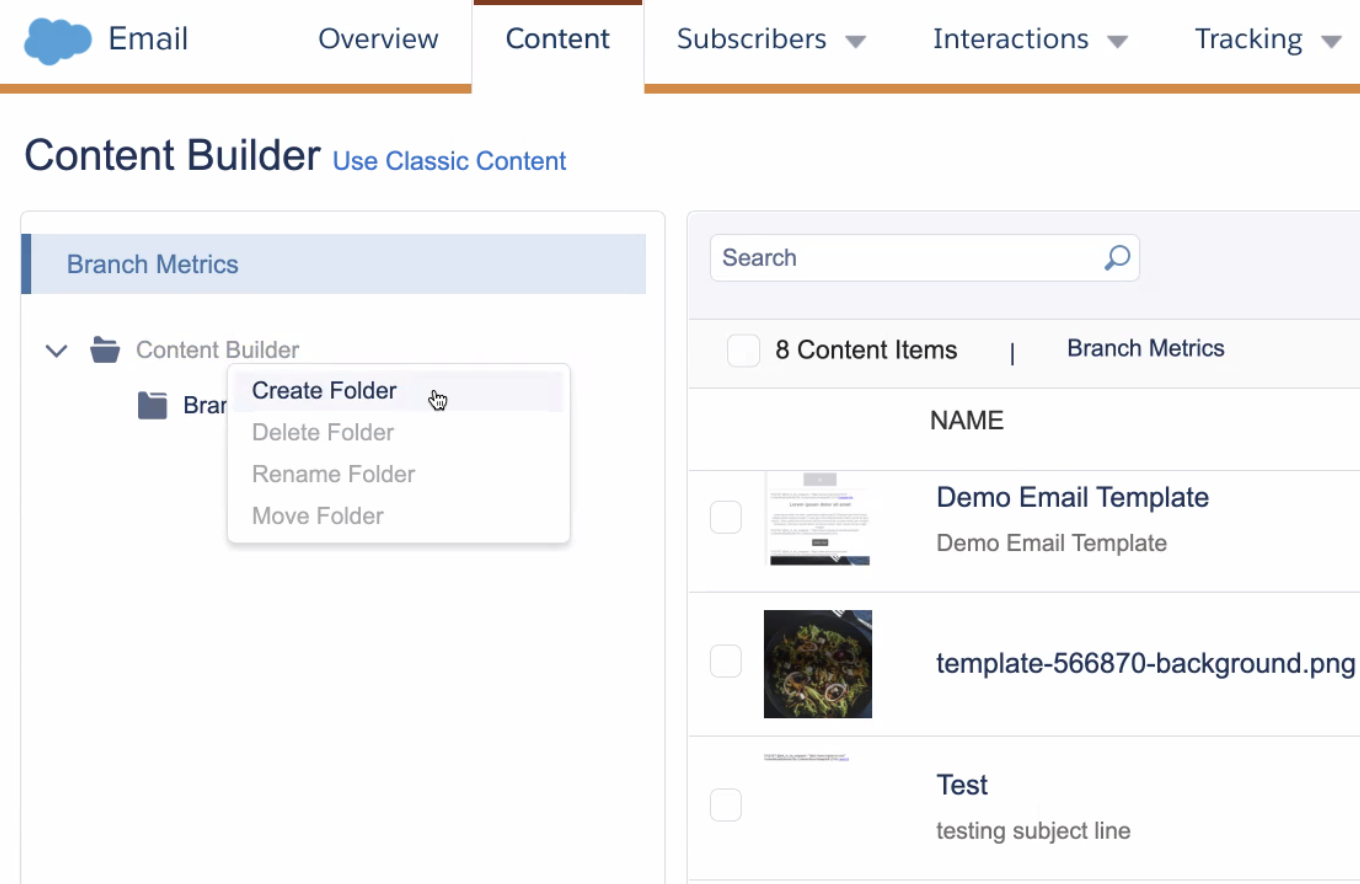
- This will take you to the landing page for the Email section. Click on Content in the menu bar to navigate to the Content section:

- In the Content section, you will see a list of folders on the left side. Right click on the My Contents folder and choose Create Folder in the content builder menu:
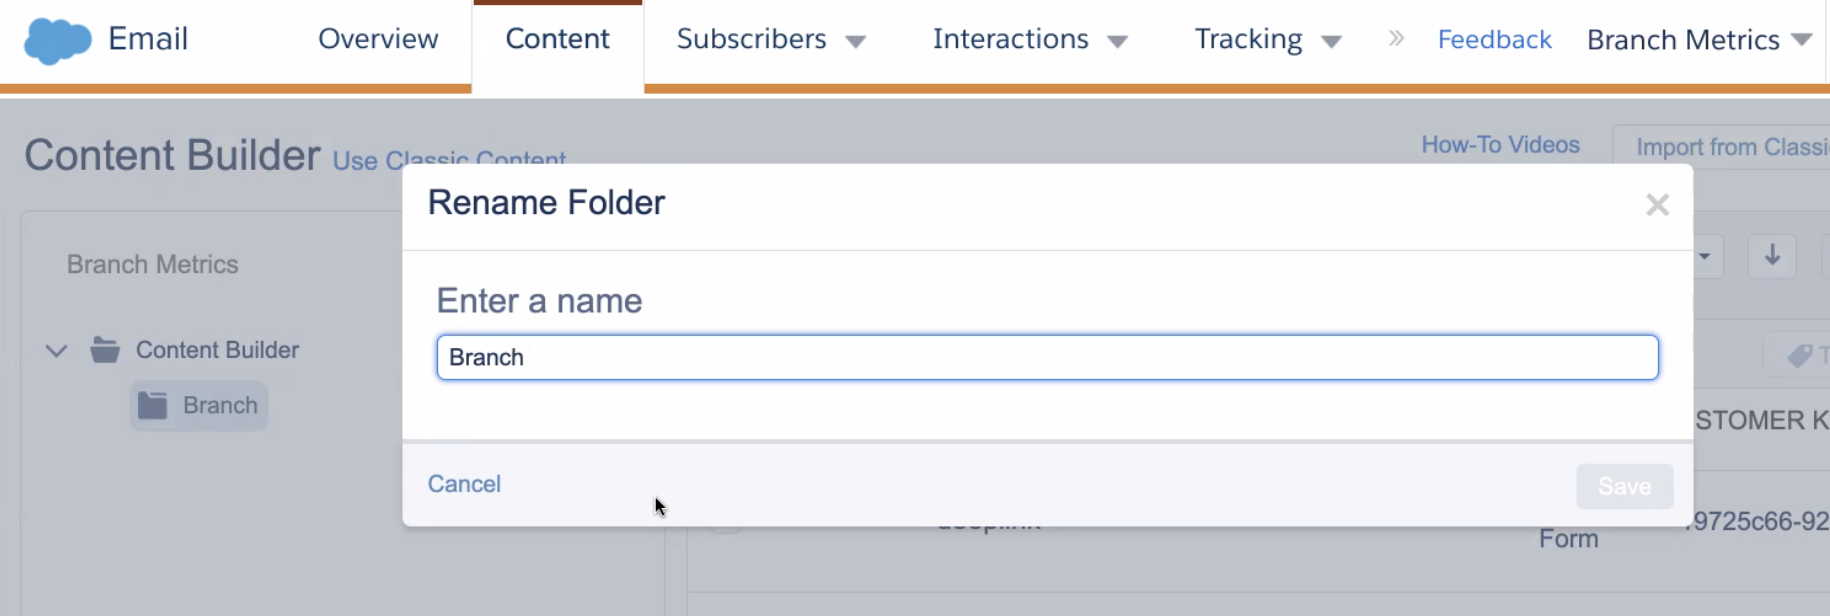
- Name the folder
Branch:
- Once the folder is created, in the upper right side, click on Create button, then click Content Blocks and finally click Free Form:

- On the Free Form screen, paste in the snippet you previouisly generated:

-
Click Save.
-
In the Create Free Form window that appears, enter
deeplinkin the text field named Content Name. Click on Save after you enter the text:

- You will now be back at your list of folders in the Content section with the file deeplink listed:
You have now successfully created the deep linking AMPscript.
Code snippet
The snippet below will follow this format. The code below also has a placeholder for
@branch_base_url. Replace it with yours.
%%[ VAR @deeplink, @branch_base_url SET @branch_base_url = "BASE URL FROM BRANCH" SET @deeplink = CONCAT(@branch_base_url, CONCAT("&%24original_url=", URLEncode(@link_to_be_wrapped, 1, 1))) ]%%
Configure your Salesforce email templates
This section covers how to convert individual links in your existing email templates into Branch deep links. You will need to do this for all links in your email template that you want to convert to Branch deep links.
For example, if you decide to convert the link below into a Branch Link:
<a href="https://branch.io/product/1234/"> I want it! </a>
This is what the link will look like in the email template, after you added the AMPscript to convert it into a Branch link:
%%[ SET @link_to_be_wrapped = "https://branch.io/product/1234/" ContentAreaByName("My Contents\branch\deeplink") ]%%
<a href="%%=RedirectTo(@deeplink)=%%">Example link</a>
The process to convert links into Branch links using AMPscript is as follows (this flow converts the links in a separate document, and then pastes them back into your final template):
-
Log in to Salesforce Marketing Cloud
-
Click on Email Studio and then a sub-menu will appear. Click on Email in the dropdown menu:

-
This will take you to the landing page for the Email section. Click on Content in the menu bar to navigate to the Content section:

-
Navigate to your folder containing your emails and open an existing email. Make sure the email is in HTML layout as shown below:

-
Choose a link that you want to convert to a Branch deep link. Copy the text right after the
href=in your email template, and paste it into a separate document. In the example, it is:"https://branch.io/product/1234/" -
Add
%%[ SET @link_to_be_wrapped =before the link in your separate document. In the example, this is now:%%[ SET @link_to_be_wrapped ="https://branch.io/product/1234/" -
Add
ContentAreaByName("My Contents\branch\deeplink"")]%%after the link:%%[ SET @link_to_be_wrapped = "https://branch.io/product/1234/"ContentAreaByName("My Contents\branch\deeplink"")]%% -
From the original link in your template, copy the text from and including
<auntil thehref=. Add it to the text after%%in the last step. Please include the<abut not thehref=:%%[ SET @link_to_be_wrapped = "https://branch.io/product/1234/" ContentAreaByName("My Contents\branch\deeplink"") ]%%<a style="_any css can be added here_" -
Add
href="%%=RedirectTo(@deeplink)=%%"to the end:%%[ SET @link_to_be_wrapped = "https://branch.io/product/1234/" ContentAreaByName("My Contents\branch\deeplink"") ]%% <a style="_any css can be added here_"href="%%=RedirectTo(@deeplink)=%%" -
From the original link in your template, copy the end of the tag, the link text, and the closing tag (
>I want it!</a>in the example) and add it to the end:%%[ SET @link_to_be_wrapped = "https://branch.io/product/1234/" ContentAreaByName("My Contents\branch\deeplink"") ]%% <a style="_any css can be added here_" href="%%=RedirectTo(@deeplink)=%%">I want it!</a> -
Copy your final result from the separate document back into your email template, replacing everything inside and including the
<a></a>tags in the template. -
Repeat this for all your links in your email template that you want to convert to Branch deep links.
Link Conversion Summary
Wherever you use
<a>tags in your email templates, replace those with AMPscript to convert the web URLs into Branch links. The AMPscript references the Content Area setup earlier.%%[SET @link_to_be_wrapped = "ADD YOUR LINK HERE" ContentAreaByName("My Contents\branch\deeplink"")]%% <a href="%%=RedirectTo(@deeplink)=%%">Click Me</a>For example,
Before:
<a href="https://branch.io/product/1234">Example link</a>
After:
%%[ SET @link_to_be_wrapped = "https://branch.io/product/1234" ContentAreaByName("My Contents\branch\deeplink") ]%%
<a href="%%=RedirectTo(@deeplink)=%%">Example link</a>
After you convert links into Branch links in your email templates, you must also add Salesforce's link attribute mc-deep-link="true" to your link tags to ensure the app opens in iOS:
<a mc-deep-link="true" href="https://my.app.link/3p?$3p=e_et&$original_url=..." > Open App </a>
Content Area Folder
Make sure your
deeplinkContent Area is in the right folder. Either change the folder to "My Contents" or change the path used by "ContentAreaByName" in the Branch script.
2. Use Branch Quick Links
Add "$3p":"e_et" to the deep link data of any links you use in email to ensure Universal Link and click tracking works as expected. Then add any other deep link keys you need for your specific deep link use cases.
After you insert Branch links into your email templates, you must also add Salesforce's link attribute mc-deep-link="true" to your link tags to ensure the app opens in iOS:
<a mc-deep-link="true" href="https://my.app.link/3p?$3p=e_et&$original_url=..." > Open App </a>
Advanced
[Optional] Tracking web links using Branch Links
This integration will not let you track web links with Branch out-of-the-box as that will be done through Salesforce. There are a couple of workarounds to track web links if there is a need to track web links. These Branch Links will open the web -- not the app.
Methods for creating Branch web tracking links:
Method 1: Modified Branch Quick Link
- In the Branch Dashboard, create a Quick Link.
- Add campaign tag for tracking.
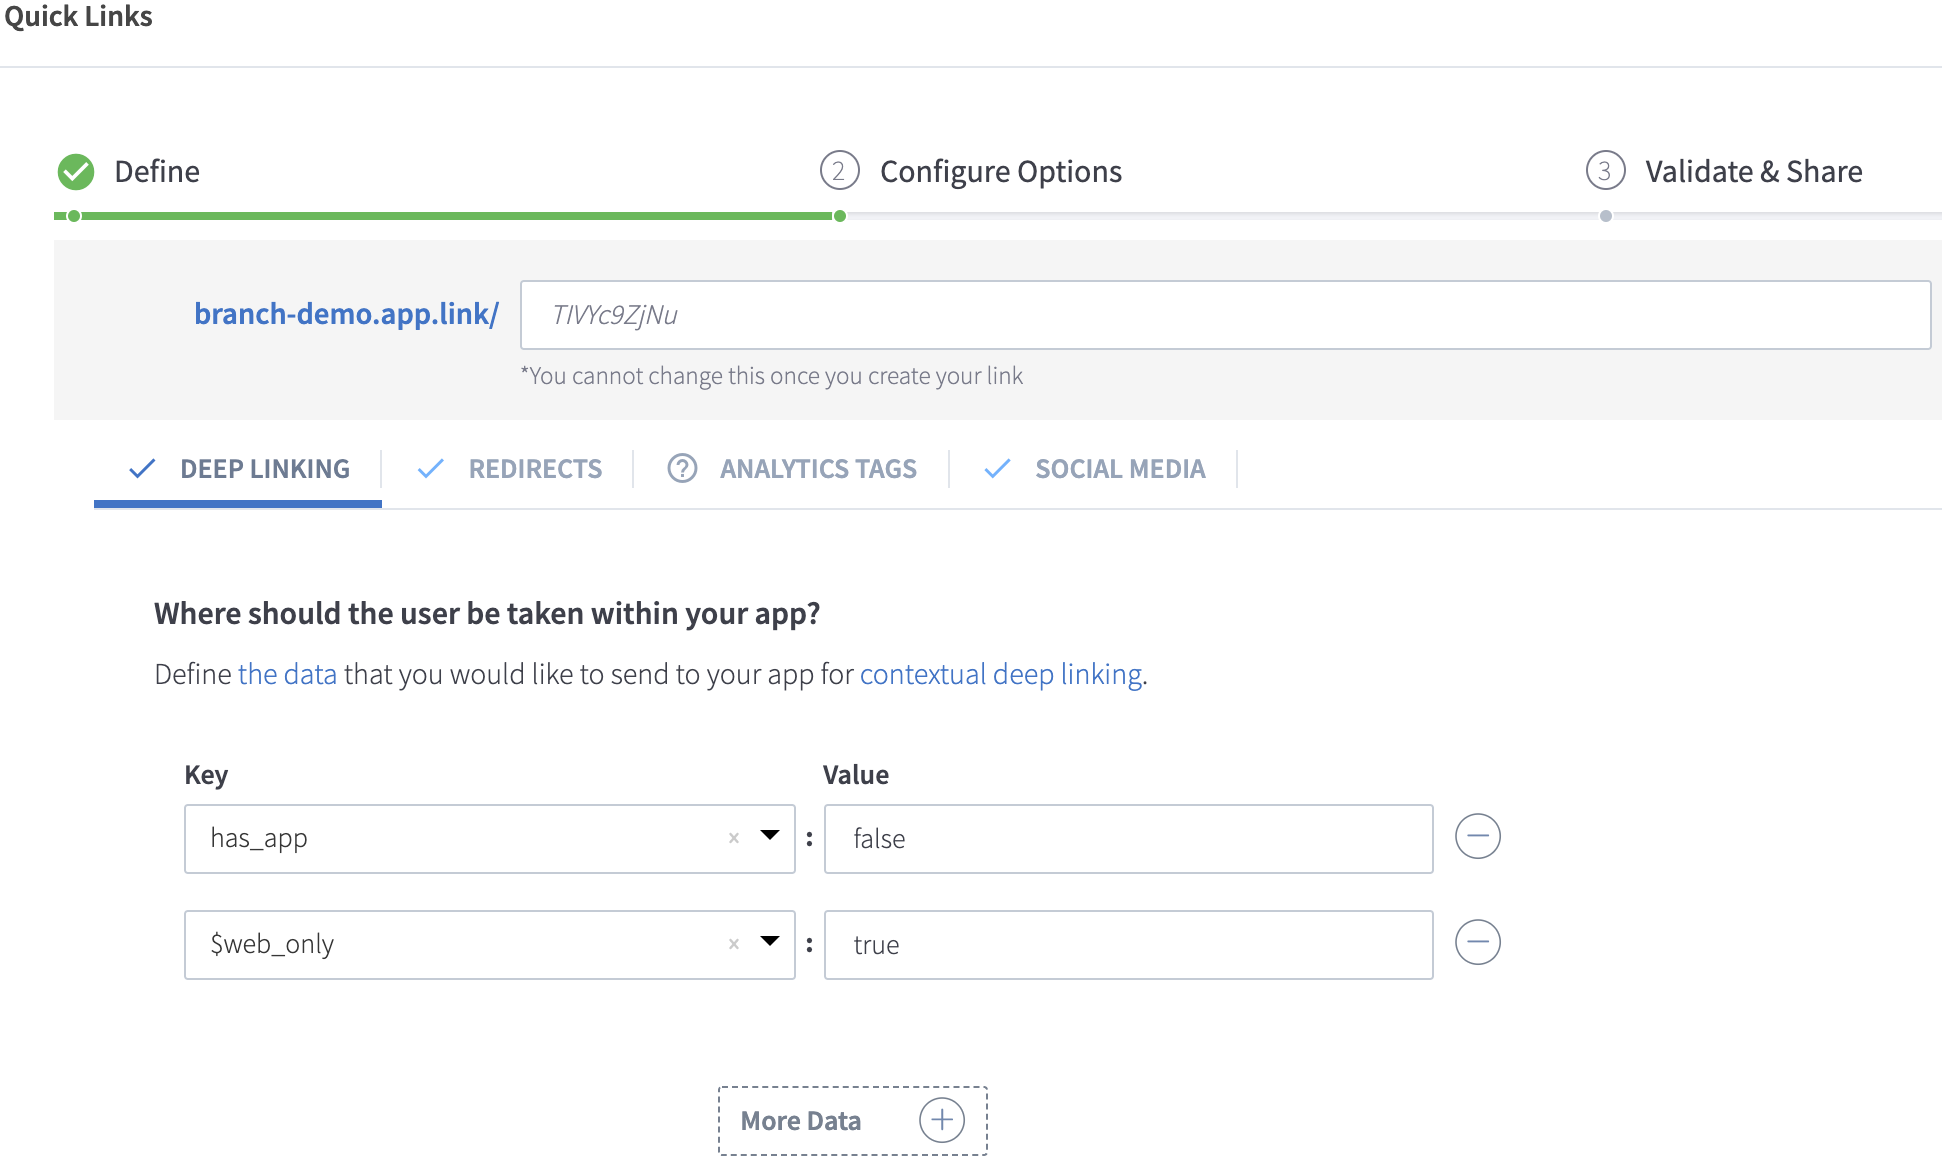
- In the Deep Linking tab, add has_app = false and $web_only = true to the link data.
-
In the Redirects tab, set the web redirects for fallbacks. Select web URL for Android, iOS, and Desktop, and add the URL you want to redirect to.
-
After the link is created, add
_webonlyto the app.link domain.
* Ex: If the link created is https://branchster.app.link/weblinktest, convert it to https://branchster_webonly.app.link/weblinktest.
Method 2: Branch Long Link
Start with your app.link domain, and add _webonly to it.
- Ex: If your app.link domain is https://branchster.app.link, convert it to https://branchster_webonly.app.link
Add has_app = false and $web_only=true as query parameters.
Add ~campaign tag to the link.
Add the URI encoded web redirect link as $fallback_url.
* Ex: (https://branchster_webonly.app.link/?has_app=false&$web_only=true&~campaign=email-test-cam&$fallback_url=https%3A%2F%2Fwww.myweblink.com%2F)[https://branchster_webonly.app.link/?has_app=false&$web_only=true&~campaign=email-test-cam&$fallback_url=https%3A%2F%2Fwww.myweblink.com%2F]
Analytics on the Branch Dashboard
To see how the email campaigns have performed and break it down into campaigns, it is very essential to tag those links with the ~campaign tag. This will help dedupe the numbers and hence see the downstream events. You can add the campaign tag in any comparisons and filters in any Dashboard views.


